Table of Contents
Understanding Linux System Drivers
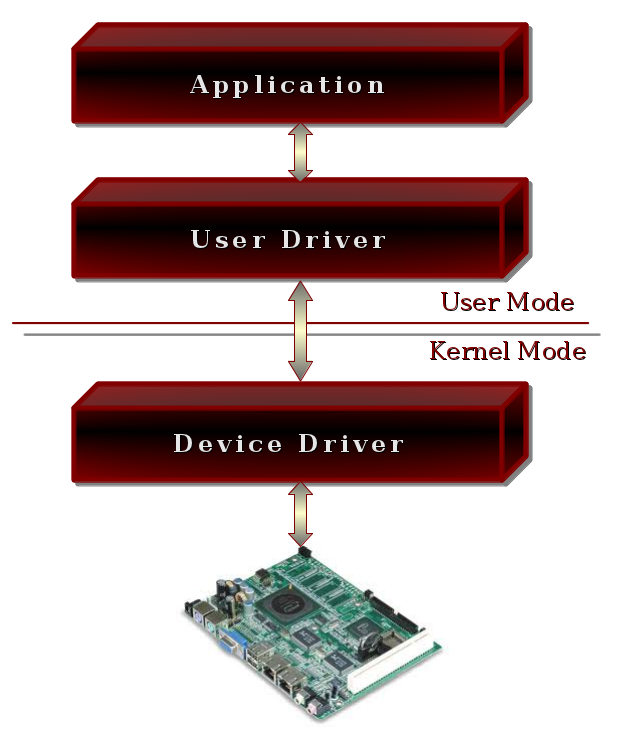
A driver is what makes the application layer communicate with the physical layer. Drivers are widely used in embedded systems as an abstraction layer. Let's take an example to understand the importance of a driver. If we consider a computer keyboard, the keyboard is connected to the computer via a cable or wirelessly. In this example, let's suppose that the keyboard is connected through a USB cable. To let the computer understand the keys pressed on the keyboard, the system must have a driver to decode the information coming from the keyboard and translate it to an ASCII character. This character is forwarded to the OS (Operating system), and the OS has to make the decision to print it to the screen or not. Depending on the functionality, the OS will make this decision.
In this article, I'll talk about GPIO (General Purpose Input Output). In a small SoC, there is no screen, and the system communication must be done via signals. The microcontroller, let's say, wants to illuminate an LED, so it must apply a 0V or 3.3V depending on the electronic configuration used.
GPIO is very important in electronic systems; they are used for communication as well. In the communication world, all is about signals, digital signals. To establish communication between two chips, they must be hard-connected, and this connection is done through a GPIO.
Kernel Modules Overview
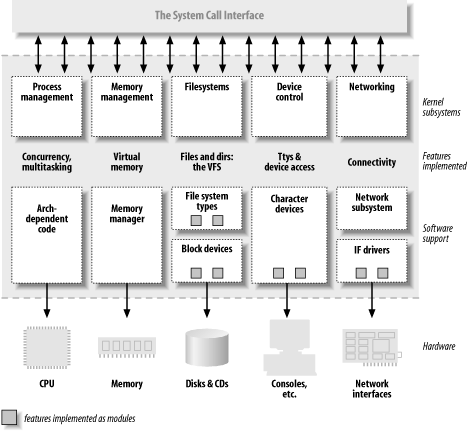
Kernel modules are pieces of code that can be dynamically loaded and unloaded into the Linux kernel. Usually they are loaded into memory during boot time of the system. They extend the functionality of the kernel without the need to reboot the system. Kernel modules can include device drivers, file systems, networking protocols, and more. In this section, I'll break down the basics of a kernel module and give a C example of each element.
Init a Driver:
- The initialization function for a kernel module is typically named
init_module(). - This function is called when the module is loaded into the kernel.
- Here's an example of initializing a simple kernel module:
#include <linux/init.h>
#include <linux/module.h>

static int __init my_driver_init(void) {
    printk(KERN_INFO "My driver loaded!\n");
    return 0;
}

module_init(my_driver_init);
Exit a Driver:
- The exit function for a kernel module is typically named
cleanup_module(). - This function is called when the module is unloaded from the kernel.
- Here's an example of cleaning up resources in a kernel module:
static void __exit my_driver_exit(void) {
    printk(KERN_INFO "My driver unloaded!\n");
}

module_exit(my_driver_exit);
Read a Driver:
- Reading from a driver typically involves implementing the
read()function. - This function is called when a user-space program reads data from the driver.
- Here's a simplified example of a read function:
// Read function
ssize_t my_driver_read(struct file *filp, char __user *buffer, size_t length, loff_t *offset) {
    // Ensure that the buffer is valid
    if (!buffer) {
        return -EINVAL; // Invalid argument error
    }

    // Read data from the driver
    // For example, reading data from a device buffer

    // Copy data from kernel space to user space
    if (copy_to_user(buffer, kernel_buffer, length) != 0) {
        return -EFAULT; // Error copying data to user space
    }

    // Return the number of bytes read
    return bytes_read;
}
It's crucial to use specific kernel routines to handle reading and writing data between user space and kernel space safely
Write a Driver:
- Writing to a driver typically involves implementing the
write()function. - This function is called when a user-space program writes data to the driver.
- Here's a simplified example of a write function:
// Write function
ssize_t my_driver_write(struct file *filp, const char __user *buffer, size_t length, loff_t *offset) {
    // Ensure that the buffer is valid
    if (!buffer) {
        return -EINVAL; // Invalid argument error
    }

    // Copy data from user space to kernel space
    if (copy_from_user(kernel_buffer, buffer, length) != 0) {
        return -EFAULT; // Error copying data from user space
    }

    // Process the data written to the driver
    // For example, updating device registers or internal buffers

    // Return the number of bytes written
    return bytes_written;
}
In the above code:
- The
copy_to_user()function is used in the read function to copy data from the kernel space (e.g., a device buffer) to the user space buffer provided as an argument. - The
copy_from_user()function is used in the write function to copy data from the user space buffer provided as an argument to the kernel space (e.g., a device buffer). - These functions ensure that data transfer between user space and kernel space is performed securely, preventing issues such as buffer overflows or unauthorized access to kernel memory.
By incorporating these details, you ensure that your driver functions are robust and follow best practices for Linux kernel programming.
Minimum C Code:
Below is a minimum C code for a kernel module. This example simply prints a message when the module is loaded and unloaded.
#include <linux/init.h>
#include <linux/module.h>
#include <linux/fs.h>
#include <linux/uaccess.h>

#define DEVICE_NAME "my_device"

static char kernel_buffer[1024]; // Example device buffer

// Read function
static ssize_t my_driver_read(struct file *filp, char __user *buffer, size_t length, loff_t *offset) {
    ssize_t bytes_read = 0;
    // Ensure that the buffer is valid
    if (!buffer) {
        return -EINVAL; // Invalid argument error
    }

    // Read data from the driver
    // For example, reading data from a device buffer

    // Copy data from kernel space to user space
    if (copy_to_user(buffer, kernel_buffer, length) != 0) {
        return -EFAULT; // Error copying data to user space
    }

    // Return the number of bytes read
    return bytes_read;
}

// Write function
static ssize_t my_driver_write(struct file *filp, const char __user *buffer, size_t length, loff_t *offset) {
    ssize_t bytes_written = 0;
    // Ensure that the buffer is valid
    if (!buffer) {
        return -EINVAL; // Invalid argument error
    }

    // Copy data from user space to kernel space
    if (copy_from_user(kernel_buffer, buffer, length) != 0) {
        return -EFAULT; // Error copying data from user space
    }

    // Process the data written to the driver
    // For example, updating device registers or internal buffers

    // Return the number of bytes written
    return bytes_written;
}

// File operations structure
static struct file_operations fops = {
    .read = my_driver_read,
    .write = my_driver_write,
};

static int __init my_module_init(void) {
    printk(KERN_INFO "Initializing my driver\n");
    // Register the character device
    if (register_chrdev(0, DEVICE_NAME, &fops) < 0) {
        printk(KERN_ALERT "Failed to register device\n");
        return -1;
    }
    printk(KERN_INFO "Device registered\n");
    return 0;
}

static void __exit my_module_exit(void) {
    // Unregister the character device
    unregister_chrdev(0, DEVICE_NAME);
    printk(KERN_INFO "Exiting my driver\n");
}

module_init(my_module_init);
module_exit(my_module_exit);

MODULE_LICENSE("GPL");
MODULE_AUTHOR("Your Name");
MODULE_DESCRIPTION("A simple example Linux module with read and write operations");
MODULE_VERSION("0.1");
These examples provide a basic understanding of kernel module initialization, cleanup, reading, and writing operations. Remember to include the necessary header files and handle error cases appropriately in real-world implementations.
Testing and Compiling GPIO Driver
In this article, we use a Raspberry Pi Computer 4 board. This board embeds an ARM microprocessor with memory and peripherals. I am using an SSH connection with my Visual Studio IDE, and the compilation process occurs directly on the running system. Of course, all the necessary or essential libraries are already installed to let the kernel generate the kernel object file.
Invoke the Driver and set and toggle a GPIO
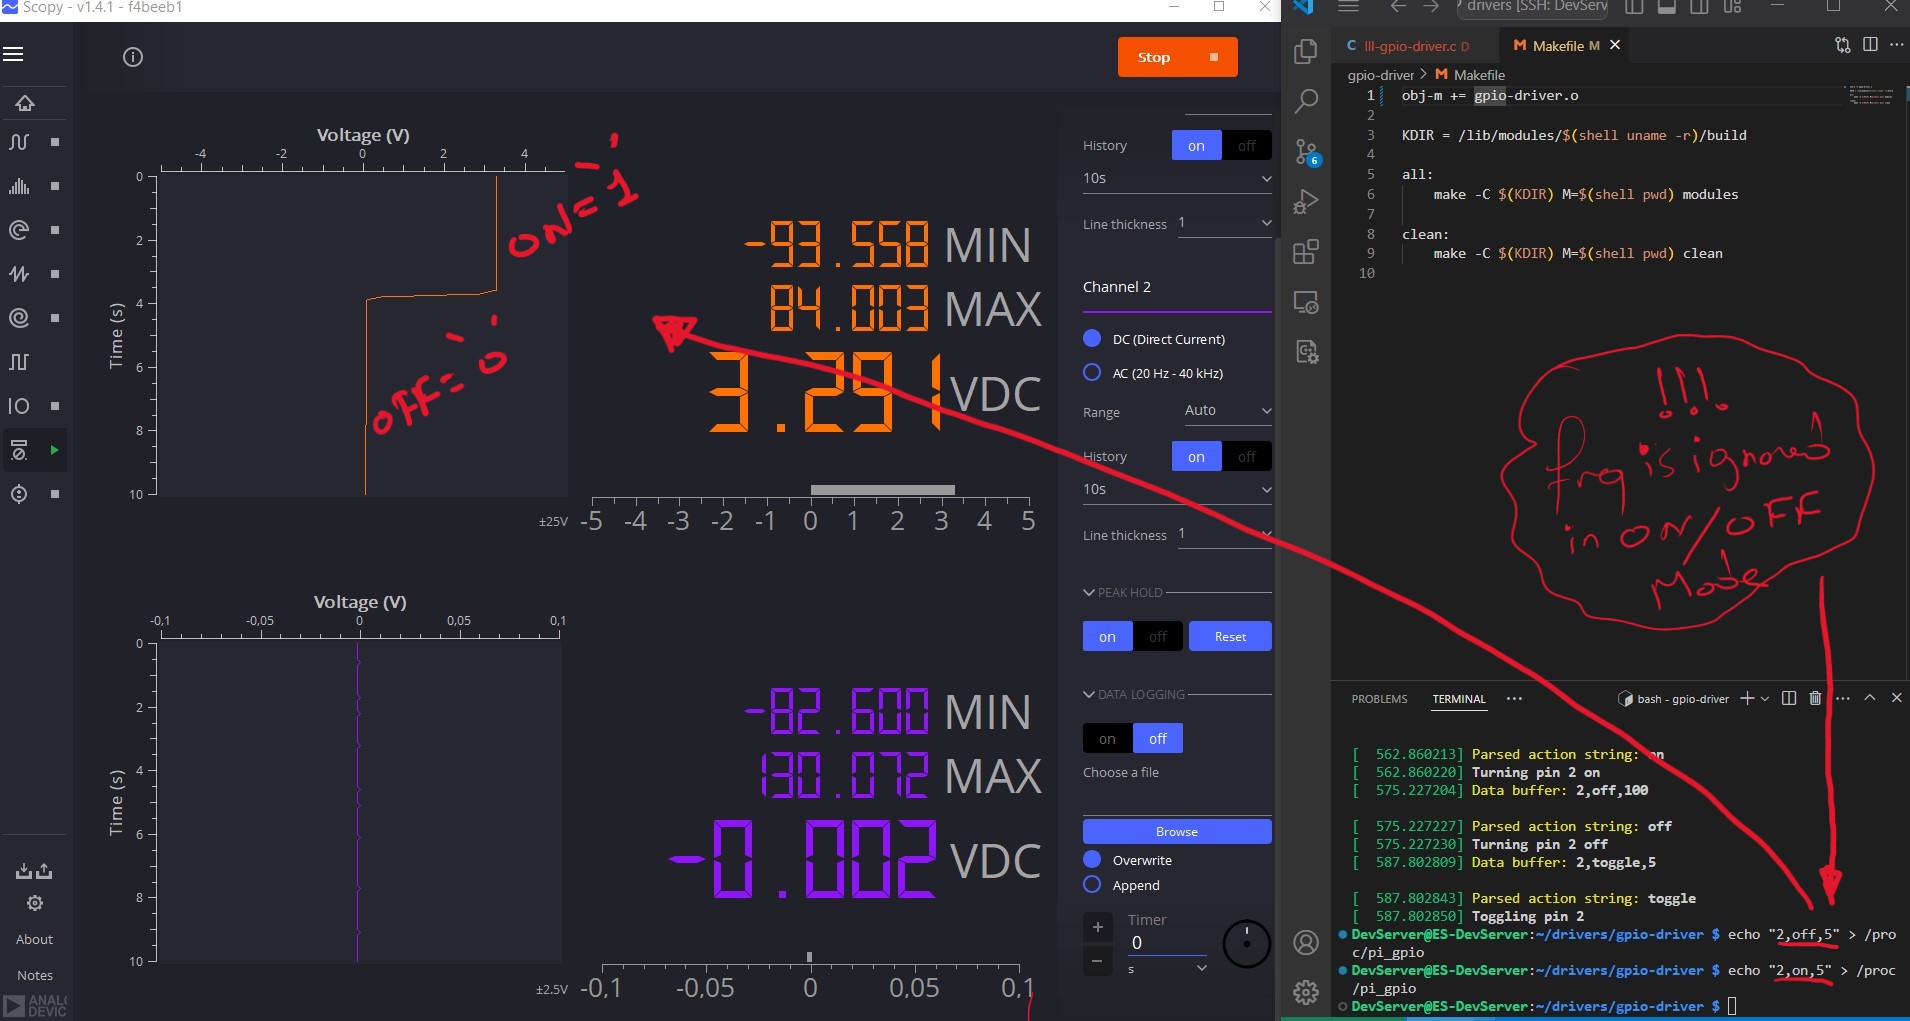
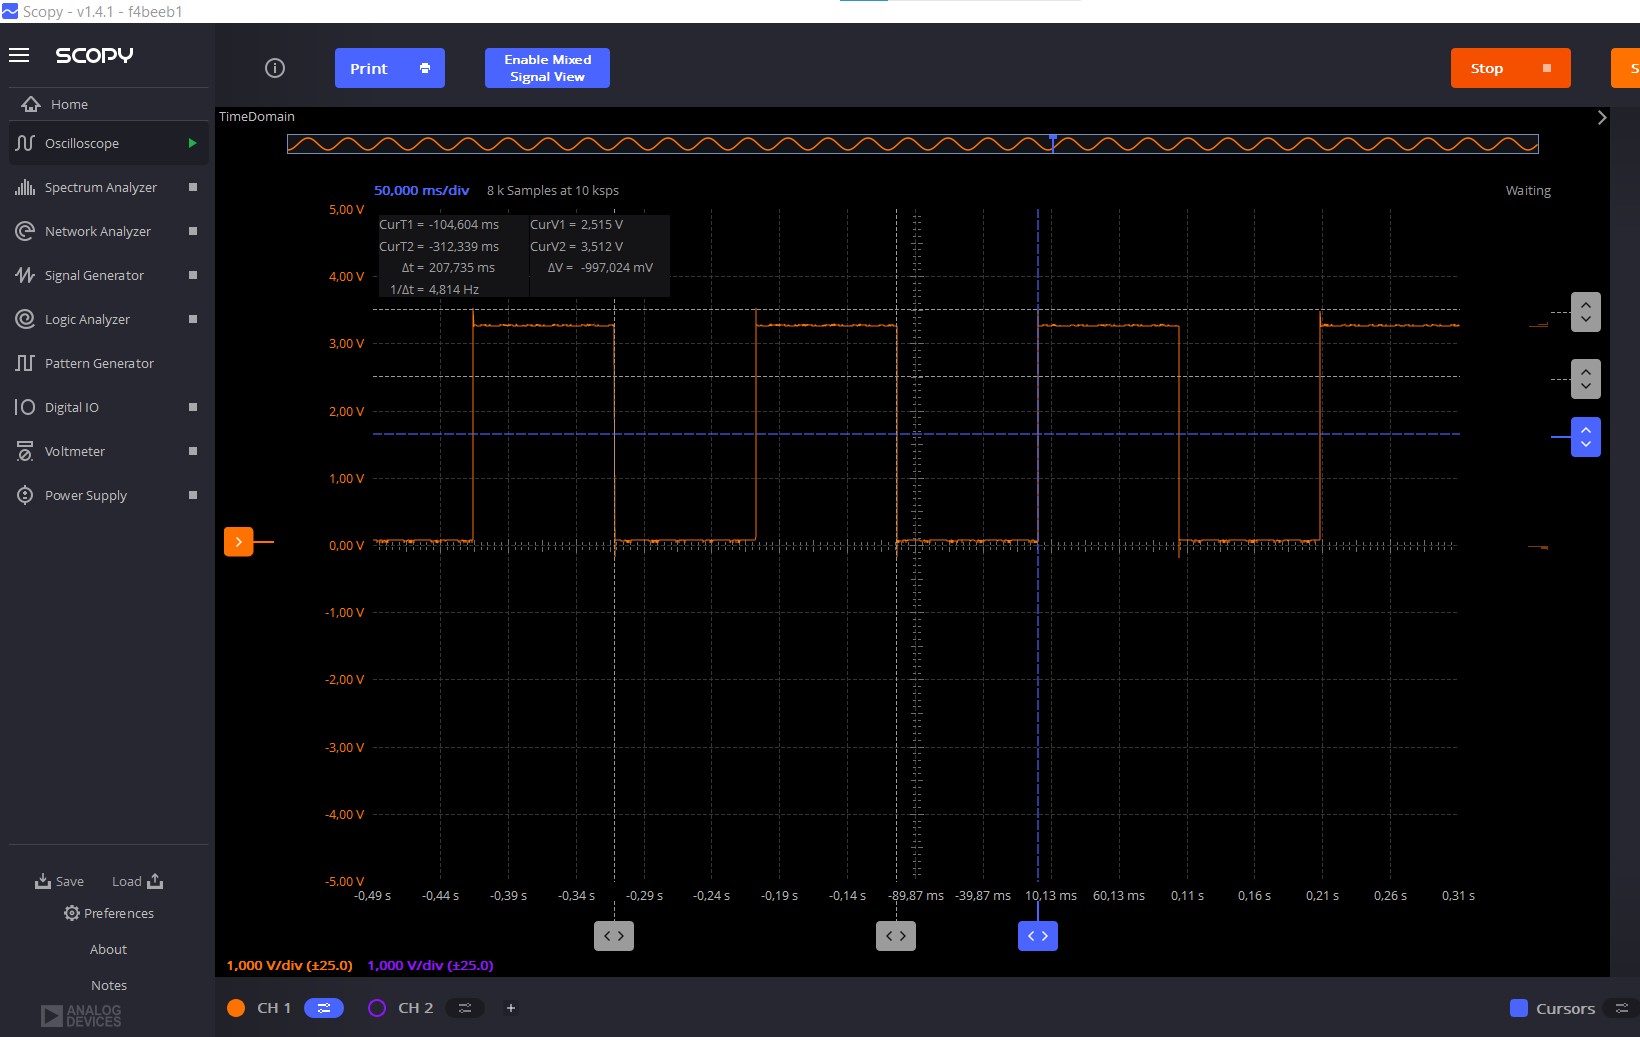
Before commencing this article, I developed a driver and decided to write an article to elucidate the scope of my research. The GPIO Driver facilitates the SET, RESET, and TOGGLE operations for any GPIO on the Raspberry Pi board, encompassing its 21 GPIOs, while the ARM boasts over 54 GPIOs. Utilizing a timer, the driver regulates the frequency of toggling. It operates by directly accessing the low-level registers.
To achieve this, it's imperative to recognize that physical memory is not directly accessible because the kernel manages it. Therefore, we must request a page or section from the kernel that maps to the GPIO memory. Writing to this page corresponds to writing to physical memory, with the MMU unit overseeing this operation.
To acheive this we have to use this C function:
void __iomem *ioremap(resource_size_t phys_addr, unsigned long size);
In my driver i called this function like this:
gpio_registers = (int*)ioremap(BCM2711_GPIO_ADDRESS, PAGE_SIZE);
Let's break it down:
-
ioremap: This function is used in the Linux kernel to map physical addresses to virtual addresses. It stands for "input/output remap". In the context of device drivers, it's often used to provide access to memory-mapped hardware registers. -
BCM2711_GPIO_ADDRESS: This is a constant representing the base address of the GPIO (General Purpose Input/Output) registers on the ARM BCM2711 SoC (System on Chip). These registers control the behavior of the GPIO pins on the Raspberry Pi. -
PAGE_SIZE: This is a constant representing the size of a memory page in the system. It's typically defined by the architecture and configuration of the system. In this case, it's used to specify the size of the memory region being mapped. -
(int*): This is a type cast, converting the result ofioremapto a pointer to an integer type. It suggests that the GPIO registers are being treated as an array of integers.
Putting it all together, the line gpio_registers = (int*)ioremap(BCM2711_GPIO_ADDRESS, PAGE_SIZE); is mapping the physical address of the GPIO registers to a virtual address, allowing the kernel and device drivers to access and manipulate these registers as if they were regular memory locations. The resulting virtual address is then stored in the variable gpio_registers, which can be used by the driver to interact with the GPIO hardware.
Management of Blocking and Non-Blocking Resources
The use of a timer is indeed crucial in this context. While there are various functions available for introducing delays in a signal, employing a timer is essential for ensuring system stability and responsiveness. Other delay mechanisms, such as busy loops or blocking functions, can lead to system hang-ups and unresponsiveness, rendering the terminal inaccessible and the system effectively useless during their execution.
Efficient resource management is fundamental to the stability and performance of any system. By effectively managing resources such as time, memory, and CPU utilization, the system can maintain stability and improve overall efficiency. This entails optimizing the allocation and utilization of these resources to minimize bottlenecks and ensure smooth operation. Efficient resource management enhances system stability and responsiveness, ultimately leading to a better user experience.
Let me give a quick example and comparison between timer use and blocking function use:
- Using udelay blocking library:
// Function to toggle a GPIO pin at a specified frequency
static void gpio_pin_toggle(unsigned int pin, unsigned int frequency)
{
    // Calculate the delay (in microseconds) based on the desired frequency
    unsigned int delay_us = 1000000 / (2 * frequency); // Divide by 2 for on/off cycle

    // Infinite loop to toggle the pin at the specified frequency
    while (1) {
        // Toggle the pin on
        gpio_pin_on(pin);
        usleep(delay_us); // Delay for half the period

        // Toggle the pin off
        gpio_pin_off(pin);
        usleep(delay_us); // Delay for half the period
    }
}
- Using kernel timer non blocking:
static void my_timer_callback(struct timer_list *t)
{
    struct my_timer_data *timer_data = from_timer(timer_data, t, timer);

    printk(KERN_INFO "Timer callback called (%d)\n", timer_data->count++);

    // Reschedule the timer to be called again after 1 second
    mod_timer(&timer_data->timer, jiffies + msecs_to_jiffies(1000));
}

static int __init timer_init(void)
{
    struct my_timer_data *timer_data;

    // Allocate memory for the timer data structure
    timer_data = kmalloc(sizeof(struct my_timer_data), GFP_KERNEL);
    if (!timer_data) {
        printk(KERN_ERR "Failed to allocate memory for timer data\n");
        return -ENOMEM;
    }

    // Initialize the timer
    timer_setup(&timer_data->timer, my_timer_callback, 0);
    timer_data->timer.expires = jiffies + msecs_to_jiffies(1000); // 1 second
    timer_data->timer.data = (unsigned long) timer_data;

    // Add the timer to the kernel's timer queue
    add_timer(&timer_data->timer);

    printk(KERN_INFO "Timer started\n");

    return 0;
}
Exploring Kernel Timers
Let's break down each element and provide C code examples for them:
1. Initializing Timers:
Initializing timers involves setting up a struct timer_list instance and associating it with a callback function. Here's how to do it:
#include <linux/timer.h>

// Define a timer structure
static struct timer_list my_timer;

// Callback function for the timer
static void timer_callback(struct timer_list *t)
{
    // Timer expiration logic here
}

// Function to initialize the timer
static void init_timer_example(void)
{
    // Initialize the timer structure
    init_timer(&my_timer);

    // Set the callback function
    my_timer.function = timer_callback;
}
2. Rescheduling Timers:
Rescheduling timers involves modifying the expiration time of a timer using mod_timer(). Here's an example:
#include <linux/timer.h>

// Define a timer structure
static struct timer_list my_timer;

// Callback function for the timer
static void timer_callback(struct timer_list *t)
{
    // Timer expiration logic here

    // Reschedule the timer to fire again after a certain interval
    mod_timer(&my_timer, jiffies + msecs_to_jiffies(1000)); // Reschedule after 1000 milliseconds
}

// Function to initialize and start the timer
static void start_timer_example(void)
{
    // Initialize the timer structure
    init_timer(&my_timer);

    // Set the callback function
    my_timer.function = timer_callback;

    // Set the expiration time
    my_timer.expires = jiffies + msecs_to_jiffies(1000); // Set initial expiration time (1000 milliseconds from now)

    // Add the timer to the kernel's timer queue
    add_timer(&my_timer);
}
3. Callback function and timer expiration:
The callback function is invoked when the timer expires. Here's an example:
#include <linux/timer.h>

// Define a timer structure
static struct timer_list my_timer;

// Callback function for the timer
static void timer_callback(struct timer_list *t)
{
    // Timer expiration logic here
    printk(KERN_INFO "Timer expired!\n");

    // Reschedule the timer to fire again after a certain interval
    mod_timer(&my_timer, jiffies + msecs_to_jiffies(1000)); // Reschedule after 1000 milliseconds
}

// Function to initialize and start the timer
static void start_timer_example(void)
{
    // Initialize the timer structure
    init_timer(&my_timer);

    // Set the callback function
    my_timer.function = timer_callback;

    // Set the expiration time
    my_timer.expires = jiffies + msecs_to_jiffies(1000); // Set initial expiration time (1000 milliseconds from now)

    // Add the timer to the kernel's timer queue
    add_timer(&my_timer);
}
4. Common Functions for Timer Management:
Here are common functions used for timer management:
init_timer(&timer): Initializes astruct timer_listinstance.add_timer(&timer): Adds a timer to the kernel's timer queue.mod_timer(&timer, expires): Modifies the expiration time of a timer.del_timer(&timer): Removes a timer from the kernel's timer queue.timer_pending(&timer): Checks if a timer is pending.
These functions are essential for managing timers in the Linux kernel. They allow for precise control over timing operations and scheduling of tasks.
Let's go through the functions commonly used to handle kernel timers in the Linux kernel:
init_timer()
- Description:
- Initializes a
struct timer_listinstance.
- Initializes a
- Input:
struct timer_list *timer: Pointer to the timer structure to be initialized.
- Output:
- None.
- Usage:
- Typically used to initialize a timer structure before setting it up with
setup_timer()ortimer_setup().
- Typically used to initialize a timer structure before setting it up with
setup_timer()
- Description:
- Initializes and sets up a
struct timer_listinstance with a callback function.
- Initializes and sets up a
- Input:
struct timer_list *timer: Pointer to the timer structure to be initialized and set up.void (*function)(unsigned long): Pointer to the callback function to be called when the timer expires.unsigned int flags: Optional flags parameter.
- Output:
- None.
- Usage:
- Commonly used to initialize a timer structure and set its callback function.
add_timer()
- Description:
- Adds a timer to the kernel's timer queue.
- Input:
struct timer_list *timer: Pointer to the timer structure to be added to the queue.
- Output:
- None.
- Usage:
- After setting up a timer with
setup_timer()ortimer_setup(), use this function to add the timer to the kernel's timer queue for scheduling.
- After setting up a timer with
mod_timer()
- Description:
- Modifies the expiration time of a timer.
- Input:
struct timer_list *timer: Pointer to the timer structure whose expiration time is to be modified.unsigned long expires: New expiration time for the timer.
- Output:
- None.
- Usage:
- Used to change the expiration time of a timer. Typically called to reschedule a timer to fire after a different duration.
del_timer()
- Description:
- Removes a timer from the kernel's timer queue.
- Input:
struct timer_list *timer: Pointer to the timer structure to be removed from the queue.
- Output:
int: Returns 1 if the timer was still active and was successfully removed, 0 otherwise.
- Usage:
- Used to cancel a timer and remove it from the kernel's timer queue. Ensure the timer is no longer active before deallocating its associated resources.
timer_pending()
- Description:
- Checks if a timer is pending (i.e., active and scheduled).
- Input:
struct timer_list *timer: Pointer to the timer structure to be checked.
- Output:
int: Returns 1 if the timer is pending (active and scheduled), 0 otherwise.
- Usage:
- Use this function to determine if a timer is currently active and scheduled to fire.
These functions provide the necessary mechanisms for managing kernel timers in the Linux kernel. They allow for the creation, modification, and removal of timers, enabling precise timing control within kernel-space code.
Exploring Low-Level Layers and GPIO Registers
#include <linux/kernel.h>
#include <linux/init.h>
#include <linux/module.h>
#include <linux/proc_fs.h>
#include <linux/slab.h>
#include <asm/io.h>
#include <linux/delay.h> // Include for msleep
#include <linux/timer.h>

#define MAX_USER_SIZE 1024

// Addresses for accessing GPIO registers, depending on the Raspberry Pi model.
#define BCM2837_GPIO_ADDRESS 0x3F200000
#define BCM2711_GPIO_ADDRESS 0xfe200000

// Globals
static struct proc_dir_entry *proc = NULL;
static char data_buffer[MAX_USER_SIZE+1] = {0};
static unsigned int *gpio_registers = NULL;
static char toggle = 0;


// Define a structure to hold timer data
struct gpio_toggle_timer {
    struct timer_list timer;
    unsigned int pin;
    unsigned int frequency;
};


/************************************************************/
/* Function Name: gpio_pin_on                               */
/* Description: Sets the specified GPIO pin to ON state.    */
/* Input: pin - the GPIO pin number to be set ON.           */
/************************************************************/
static void gpio_pin_on(unsigned int pin)
{
    unsigned int fsel_index = pin/10;
    unsigned int fsel_bitpos = pin%10;
    unsigned int* gpio_fsel = gpio_registers + fsel_index;
    unsigned int* gpio_on_register = (unsigned int*)((char*)gpio_registers + 0x1c);

    *gpio_fsel &= ~(7 << (fsel_bitpos*3));
    *gpio_fsel |= (1 << (fsel_bitpos*3));
    *gpio_on_register |= (1 << pin);

    return;
}
/************************************************************/
/* Function Name: gpio_pin_off                              */
/* Description: Resets the specified GPIO pin to OFF state. */
/* Input: pin - the GPIO pin number to be reset OFF.        */
/************************************************************/
static void gpio_pin_off(unsigned int pin)
{
    unsigned int *gpio_off_register = (unsigned int*)((char*)gpio_registers + 0x28);
    *gpio_off_register |= (1<<pin);
    return;
}
/************************************************************/
/* Function Name: gpio_pin_toggle                           */
/* Description: Toggles the state of the specified GPIO pin.*/
/*              Uses gpio_pin_on and gpio_pin_off functions */
/*              internally.                                 */
/* Input: pin - the GPIO pin number to be toggled.          */
/************************************************************/
static void gpio_pin_toggle(unsigned int pin)
{
    // Toggle the GPIO pin
    // Since the ARM has not a toggle bit I ll use the on and off functions
    if ((toggle & 0x01) == 1)
    {
        // set
        gpio_pin_on(pin);
    }
    else
    {
        // reset
        gpio_pin_off(pin);
    }
    toggle ^= 1;

}
/************************************************************/
/* Function Name: gpio_toggle_stop                          */
/* Description: Stops the timer used for toggling GPIO pins */
/*              and releases resources.                     */
/* Input: toggle_timer - pointer to the toggle timer        */
/*        structure.                                        */
/************************************************************/
static void gpio_toggle_stop(struct gpio_toggle_timer *toggle_timer)
{
    del_timer_sync(&toggle_timer->timer);
    kfree(toggle_timer);
}
/************************************************************/
/* Function Name: gpio_toggle_timer_callback                */
/* Description: Callback function executed when the toggle  */
/*              timer expires. Toggles the GPIO pin state   */
/*              and restarts the timer.                     */
/* Input: t - pointer to the timer_list structure.          */
/************************************************************/
static void gpio_toggle_timer_callback(struct timer_list *t)
{
    struct gpio_toggle_timer *toggle_timer = container_of(t, struct gpio_toggle_timer, timer);

    // Toggle the GPIO pin
    gpio_pin_toggle(toggle_timer->pin);

    // Restart the timer
    mod_timer(&toggle_timer->timer, jiffies + msecs_to_jiffies(1000 / (2 * toggle_timer->frequency))); // Toggle every half period
}
/*************************************************************/
/* Function Name: gpio_toggle_init                           */
/* Description: Initializes and starts the timer for toggling*/
/*              the GPIO pin.                                */
/* Input: pin - the GPIO pin number to be toggled.           */
/*        frequency - the frequency of toggling in Hz.       */
/* Output: Pointer to the initialized toggle timer structure */
/*         on success, NULL on failure.                      */
/*************************************************************/
static struct gpio_toggle_timer *gpio_toggle_init(unsigned int pin, unsigned int frequency)
{
    struct gpio_toggle_timer *toggle_timer;

    // Allocate memory for the toggle timer
    toggle_timer = kmalloc(sizeof(struct gpio_toggle_timer), GFP_KERNEL);
    if (!toggle_timer) {
        printk("Failed to allocate memory for toggle timer\n");
        return NULL;
    }

    // Initialize the toggle timer
    toggle_timer->pin = pin;
    toggle_timer->frequency = frequency;
    timer_setup(&toggle_timer->timer, gpio_toggle_timer_callback, 0);
    toggle_timer->timer.expires = jiffies + msecs_to_jiffies(1000 / (2 * frequency)); // Toggle every half period

    // Start the timer
    add_timer(&toggle_timer->timer);

    return toggle_timer;
}
/************************************************************/
/* Function Name: read                                      */
/* Description: Reads data from the file associated with the*/
/*              GPIO driver.                                */
/* Input: file - pointer to the file structure.             */
/*        user - pointer to the buffer to store the read    */
/*               data.                                      */
/*        size - size of the buffer.                        */
/*        off - pointer to the file offset.                 */
/* Output: Number of bytes read on success, 0 on failure.   */
/************************************************************/
ssize_t read(struct file *file, char __user *user, size_t size, loff_t *off)
{
    return copy_to_user(user,"Hello!\n", 7) ? 0 : 7;
}
/************************************************************/
/* Function Name: write                                     */
/* Description: Writes data to the file associated with the */
/*              GPIO driver.                                */
/* Input: file - pointer to the file structure.             */
/*        user - pointer to the buffer containing the data  */
/*               to be written.                             */
/*        size - size of the data buffer.                   */
/*        off - pointer to the file offset.                 */
/* Output: Number of bytes written on success, 0 on failure.*/
/************************************************************/
ssize_t write(struct file *file, const char __user *user, size_t size, loff_t *off)
{
    unsigned int pin = UINT_MAX;
    char action_str[16];
    unsigned int frequency = 0;
    static struct gpio_toggle_timer *toggle_timer = NULL;

    memset(data_buffer, 0x0, sizeof(data_buffer));

    if (size > MAX_USER_SIZE)
    {
        size = MAX_USER_SIZE;
    }

    if (copy_from_user(data_buffer, user, size))
        return 0;

    printk("Data buffer: %s\n", data_buffer);

    // Parse input string
    if (sscanf(data_buffer, "%d,%15[^,],%d", &pin, action_str, &frequency) < 2)
    {
        printk("Improper data format submitted\n");
        return size;
    }

    if (pin > 21 || pin < 0)
    {
        printk("Invalid pin number submitted\n");
        return size;
    }

    printk("Parsed action string: %s\n", action_str); // Print parsed action string

    // Parse action string to enum or compare strings
    if (strcmp(action_str, "on") == 0)
    {

        // If timer is active, stop it
        if (toggle_timer) {
            gpio_toggle_stop(toggle_timer);
            toggle_timer = NULL;
        }

        // Turn the pin on
        printk("Turning pin %d on\n", pin);
        gpio_pin_on(pin);


    }
    else if (strcmp(action_str, "off") == 0)
    {
        // If timer is active, stop it
        if (toggle_timer) {
            gpio_toggle_stop(toggle_timer);
            toggle_timer = NULL;
        }

        // Turn the pin off
        printk("Turning pin %d off\n", pin);
        gpio_pin_off(pin);

    }
    else if (strcmp(action_str, "toggle") == 0)
    {
        // Toggle the pin
        printk("Toggling pin %d\n", pin);

        // If timer is not active, start it
        if (!toggle_timer) {
            toggle_timer = gpio_toggle_init(pin, frequency);
        } else {
            // If timer is active, stop it
            gpio_toggle_stop(toggle_timer);
            toggle_timer = NULL;
        }
    }
    else
    {
        printk("Invalid action: %s\n", action_str); // Print invalid action
        return size;
    }

    return size;
}


static const struct proc_ops proc_fops =
{
    .proc_read = read,
    .proc_write = write,
};


// Module Init
static int __init gpio_driver_init(void)
{
    printk("Welcome to GPIO driver!\n");

    gpio_registers = (int*)ioremap(BCM2711_GPIO_ADDRESS, PAGE_SIZE);

    // Test the MMU page from the kernel
    if (gpio_registers == NULL)
    {
        printk("Failed to map GPIO memory to driver\n");
        return -1;
    }

    printk("Successfully mapped in GPIO memory\n");

    // create an entry in the proc-fs
    proc = proc_create("pi_gpio", 0666, NULL, &proc_fops);

    if (proc == NULL)
    {
        return -1;
    }

    return 0;
}

// Module cleaning
static void __exit gpio_driver_exit(void)
{
    printk("Leaving GPIO driver!\n");
    iounmap(gpio_registers);
    proc_remove(proc);
    //TODO you must release the timer resources here


    return;
}

module_init(gpio_driver_init);
module_exit(gpio_driver_exit);

MODULE_LICENSE("GPL");
MODULE_AUTHOR("Tarik Semrade");
MODULE_DESCRIPTION("GPIO On Off and toggle");
MODULE_VERSION("1.0");
Makefile
To build our driver, we must have a Makefile in the same directory. The Makefile calls the kernel and generates the .ko (kernel object) file.
obj-m += gpio-driver.o

KDIR = /lib/modules/$(shell uname -r)/build

all:
    make -C $(KDIR) M=$(shell pwd) modules

clean:
    make -C $(KDIR) M=$(shell pwd) clean
Debugging and testing
Debugging a driver involves a series of steps to ensure its proper functionality within the system.
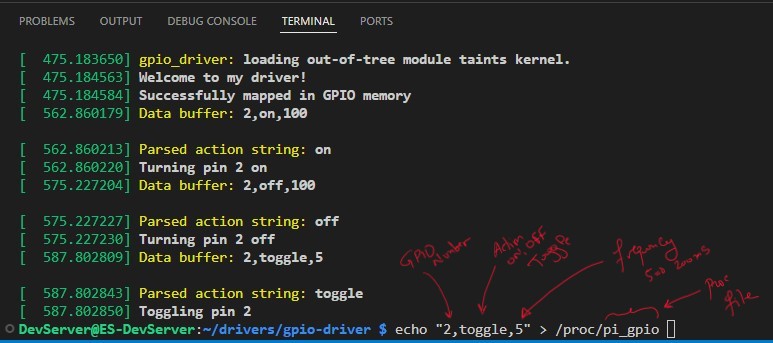
Firstly, to load a module into the kernel, the command sudo insmod xxx.ko is used, where xxx.ko represents the name of the module file. Once loaded, the system's message log can be checked using the dmesgcommand to view any messages generated by the module. This provides valuable information for troubleshooting and understanding the module's behavior. When it's necessary to unload the module, the command sudo rmmod xxx.ko is employed, ensuring a clean removal from the kernel.
To verify the status of loaded modules, the lsmod command lists all currently loaded modules.
Additionally, for detailed information about a specific module, navigating to its directory with cd /sys/module/gpio_ctrl allows access to version details, parameter lists, and other relevant information.
Lastly, to obtain comprehensive information about the module, the command modinfo xxx.koprovides a summary of its attributes and parameters, aiding in the debugging process. These steps collectively facilitate efficient debugging and maintenance of kernel drivers.
🏷️ Author position : Embedded Software Engineer
🔗 Author LinkedIn : LinkedIn profile
Comments